Solving large problems using HPC
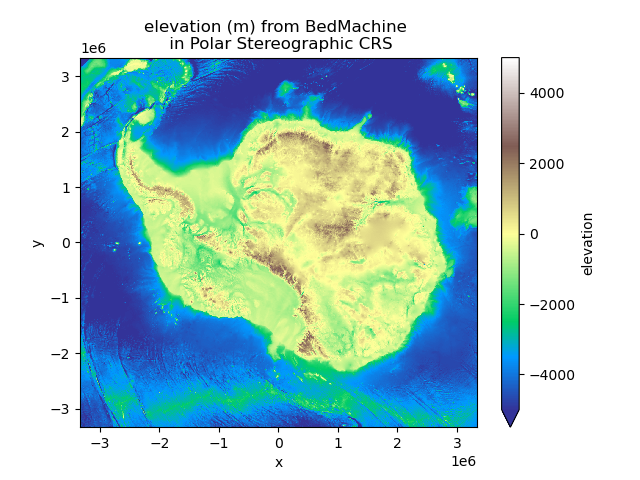
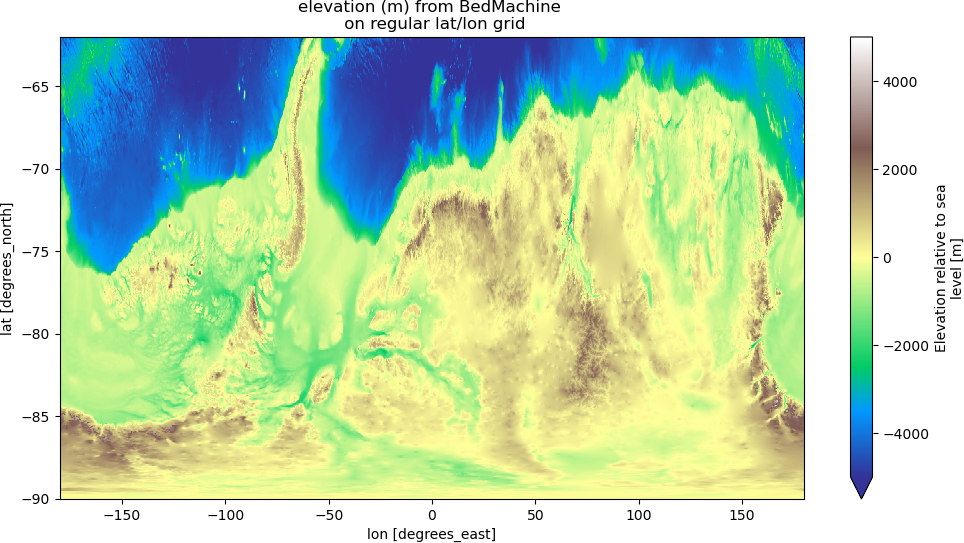
In some cases, the sizes of the source and target grids lead to weights that either take too long to compute or can’t fit into memory on a regular desktop/laptop machine. But fear not, there are solutions to solve large regridding problems, provided you have access to a High Performance Computing machine. Your ESMF installation (from conda or equivalent) comes with command line tools (ESMF_RegridWeightGen and ESMF_Regrid) that can be executed in parallel with MPI. This allows very large regridding to be performed in minutes on hundred of compute cores. Using these tools, we are able to regrid data at 500 meters resolution (13300x13300 pts) from a South Polar Stereographic projection to a 15’ regular longitude/latitude grid (6720x86400 pts). The original:
and after regridding:
Although these tools are very performant, they lack critical documentation which makes them hard to understand and operate. We’re going to try to bridge those gaps with some real-life examples. The roadblocks that you are most likely to find on your way are related to netcdf attributes required by the ESMF tools. Error messages are not very informative and one may need to read the source code to figure out what the problem is. The first trick you need to know is that geographical coordinates both need units netcdf attributes and these units can only be from the lists:
degrees_east, degree_east, degrees_E, degree_E, degreesE, degreeE for longitude
degrees_north, degree_north, degrees_N, degree_N, degreesN, degreeN for latitude
Otherwise, ESMF will fail with an error along the lines of file type not recognized. For conservative regridding, the units of the longitude and latitude arrays at the cell corners have to be grid_corner_lon and grid_corner_lat.
output from ncdump -h on your netcdf file should look like:
variables:
        double lat(lat) ;
                lat:_FillValue = 1.e+20 ;
                lat:units = "degrees_north" ;
        double lon(lon) ;
                lon:_FillValue = 1.e+20 ;
                lon:units = "degrees_east" ;
dimensions and coordinates names do not need to be the same and coordinates can be 2d.
Creating weights on HPC and using them in xESMF
With your source and destination grids ready, you can now generate weights on your HPC system that you can later use in xESMF by providing the filename and reuse_weights=True when creating a regridder. The invocation to the weights generation on a MPI parallel system using 252 cores will look like:
$ mpirun -np 252 ESMF_RegridWeightGen -s source.nc -d destination.nc -w weights.nc -m bilinear
In this example, we use bilinear regridding but all the methods available in xESMF are here too. You can then import your weights generated on your HPC system in xESMF with:
import xarray as xr
import xesmf as xe

ds_in = xr.open_dataset("source.nc")
ds_out = xr.open_dataset("destination.nc")
regridder = xe.Regridder(ds_in, ds_out, "bilinear", filename="weights.nc", reuse_weights=True)
There is a lot of options you can provide to ESMF_RegridWeightGen and you can have a list using:
$ ESMF_RegridWeightGen --help
Some of particular interest are:
–netcdf4: netcdf3 cannot handle very large files that can be produced here
–src_regional / –dst_regional: if one of your grid is not periodic in longitude
Regrid variable(s) on HPC system
If the weights you have generated don’t fit into memory when using xESMF (e.g. you have an error of the type buffer size too small), you still have the option to do the regridding of your variable on the HPC using ESMF_Regrid. Here again, there is a second trick that you need to know:
all the variables you want to regrid need to have a netcdf attribute named coordinates that gives the list of its geographical coordinates, e.g.:
variables:
        double lat(lat) ;
                lat:_FillValue = 1.e+20 ;
                lat:units = "degrees_north" ;
        double lon(lon) ;
                lon:_FillValue = 1.e+20 ;
                lon:units = "degrees_east" ;
        short elevation(lat, lon) ;
                elevation:_FillValue = 32767s ;
                elevation:units = "m" ;
                elevation:standard_name = "height_above_reference_ellipsoid" ;
                elevation:long_name = "Elevation relative to sea level" ;
                elevation:coordinates = "lon lat" ;
Also specifying a _FillValue explicitly instead of a NaN is also a good idea ;)
ESMF_Regrid will overwrite the destination.nc file and add the regridded variables so you may want to make a copy in case (say output.nc). We can now invoke the regridding for the variable elevation on the HPC using:
$ mpirun -np 720 ESMF_Regrid -s source.nc -d output.nc -m bilinear --src_var elevation --dst_var elevation --netcdf4
And this gets the job done! If for some reason, ESMF_Regrid dies with a MPI error, try increasing the number of compute cores. Similarly, you can get the numerous available options with:
$ ESMF_Regrid --help
There is a lot to unpack when it comes to the options so this might be a good time to start exploring by yourself. Hopefully this gave you enough information to work it out.
Technical point: mpi4py considerations
If your HPC system does not provide a satisfying ESMF module, you may need to install it yourself through conda. This is fine and should mostly work smoothly except that you may have some MPI issues or conflicts. To use ESMF_Regrid, you will need to activate your conda env but it is likely that the mpirun in it will not work on your HPC system because it hasn’t been set up properly.
The solution is to install mpi4py from scratch and customize its mpi.cfg file to your MPI libraries specifications. The block to add to mpi.cfg should look like this:
[gaea-gnu]
mpi_dir              = /opt/cray/pe/mpt/7.7.11/gni/mpich-gnu/8.2
include_dirs         = %(mpi_dir)s/include
libraries            = mpich
library_dirs         = %(mpi_dir)s/lib
runtime_library_dirs = %(mpi_dir)s/lib
mpicc                = /opt/gcc/8.2.0/bin/gcc
mpicxx               = /opt/gcc/8.2.0/bin/g++
And then recompile mpi4py from scratch:
wget https://bitbucket.org/mpi4py/mpi4py/downloads/mpi4py-3.0.3.tar.gz
tar -zxf mpi4py-3.0.3.tar.gz
conda activate myenv
cat gaea_mpi.cfg >> mpi4py-3.0.3/mpi.cfg
pushd mpi4py-3.0.3
python setup.py build --mpi=gaea-gnu
python setup.py install